Thank you for purchasing the only, made in the USA, pose-able Garden Pal.
Your kit contains:
- 2 Conduit Straps
- 5 1-1/2 Hex Bolts
- 5 Wing Nuts
- 2 Wood Screws
- 3 Dowel Pins (1 extra just in case)
- 1 Pair Gloves
- Durable polypropylene printed feedbag for head
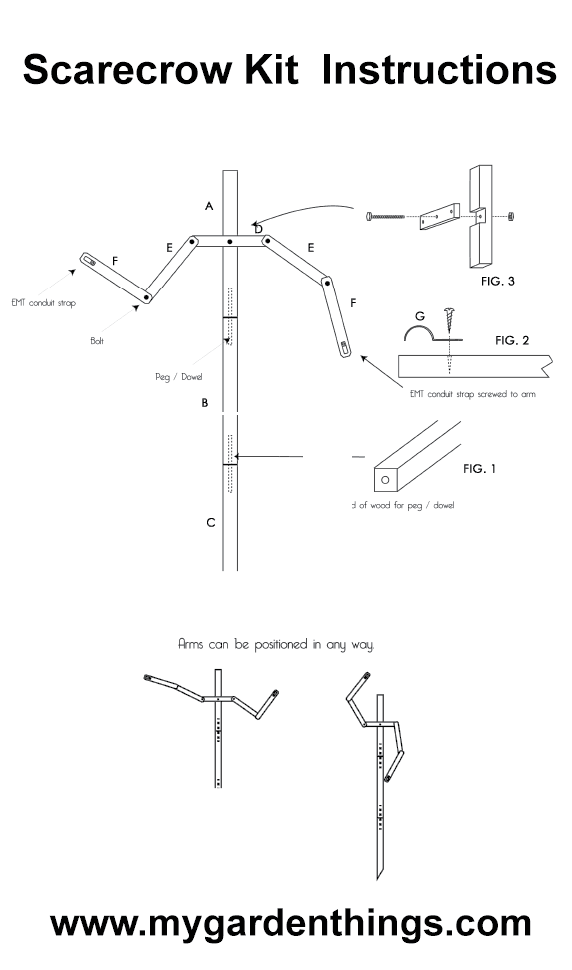
- 3 Wood Vertical Body Parts A, B and C
- 1 Wood Shoulder Piece D
- 2 Wood Upper Arms E
- 2 Wood Forearms F
This is an unfinished wood product. Wear gloves to assemble.
You will need:
- Wood Glue (optional)
- Pliers
- Phillips Screwdriver
1. Each of the vertical body pieces has holes for dowels for holding one piece to another. Insert dowels. FIG. 1
Dowels should have a tight fit. Wood shrinks and expands so if dowels are loose, split plastic bag holding kit hardware and put over dowels before inserting. Or, dowels can be permanently glued with wood glue. The drawback to gluing the body pieces together is it takes more space to store the Garden Pal. If gluing, follow glue manufacturers recommendations.
2. Place vertical assembly into the soil or container. If soil is hard, dig a hole and bury approximately 8”. Tamp soil tightly.
A 5 gallon bucket is a great anchor and base for Garden Pal.
We find it easier to put pants or skirt on now by sliding them down over assembled vertical body parts.
3. Next assemble the shoulder and arms; parts D, E (2) and F (2)
The arms are made of two pieces of wood. The upper has holes for bolts drilled in the both ends. The lower arm has one hole smaller. This small hole is a pilot hole for attaching the “hand”.
Layout the arms and shoulder on a table or the ground. Remember the song “the shoulder bone is connected to the arm bone, the arm bone is connected to the….” That is what we are doing. It helps if you hum along.
Attach the upper arms E to the shoulder piece D with hex bolt and wing nut.
Add the lower arms by attaching F to E with hex bolts and wing nuts. Don’t worry about the position of the arms, it is easier to adjust them after Garden Pal is dressed.
Included in the kit are two pieces of metal, G, shaped like a scoop. Technically they are called electrical metal conduit straps, but we call them his hands. Screw them to the end of arms F, using the small pilot holes. (Figure 2) They work to hold things.
Last step….
4. Put the shoulder D in the notch on vertical body A. Insert a bolt and fasten it tight with a wing nut. Figure 3.
That’s it! The Garden Pal is assembled. Stuff his head with plastic bags to give it shape and slide over the top of vertical body A. Tie into place if need be.
If you’re going for a traditional “scarecrow” look, we’ve provided burlap cuffs to wrap around the Garden Pal’s arms.
You decide what the “Pal” will wear.